1. In a new worksheet, enter the following expressions. Leave some space around the variable definitions.
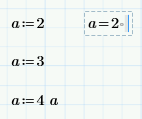
2. Select the math region with the result a = 2.
3. To move the math region above and below and to the left and to the right of the other math regions, press the Arrow keys. Notice how the following rules influence the result of the math region:
◦ PTC Mathcad only recognizes variable definitions that are above or to the left of the variable evaluation. Otherwise an error is returned. The only exception to that rule is for built-in constants. For example, type c =. The result returned is the speed of light.
◦ When you redefine a variable, the new definition applies from that point onward, to its right and below.
◦ You can redefine a variable in terms of itself.
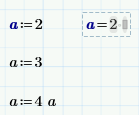
4. To differentiate between several math types, such as variables, functions, or units, apply labels to their names. For example, label the first a as a unit. Place the cursor next to each name, and on the Math tab, in the Style group, select a new label from the Labels list. The format of the letter a changes to reflect the change in label.
5. Repeat steps 2 and 3 and notice how labels affect the result of the math region.
◦ In some cases PTC Mathcad automatically assigns labels to elements. For example, when you insert a function, a constant, or a unit from the Ribbon, it is already labeled.
◦ The label format for a particular math type is the same throughout the worksheet. To customize label formats, you can use the options on theMath Formatting tab, in the Label Styles group.
◦ For more information on labels, refer to the Help.